Saturday, January 19, 2013

The Eyebrow Pictorial

  Eyebrows Frame The Face

In my experience as a Makeup Artist, the thing I get asked about most are my eyebrows.  Every one wants to know how I do them. If I'm honest with you all, I don't have much of an eye brow naturally.  I really have to work at creating the nice, full eyebrow I've always dreamed of.

So how do I go from this.....

My natural eyebrows

To This...

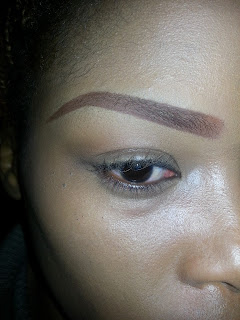
My Complete Brow Look

I'll show you how in the following pictures.  I know, I know, you all want video.  I tried to record this, but doing this on myself and recording was just not working out. I need to film myself doing this brow look on someone else in order for this to work...so if any of you lovelies want to volunteer your time, please e-mail me: ritchbeauty@gmail.com ...Now on to the pictures:

Step 1:
Apply AMPLE amount of Loose Translucent Poweder ALL over your eyebrow. The powder that I am using is not currently available. I recommend using Maybelline's Translucent Shine Free Powder in Medium.


Step Two: 
Using short, light, thin strokes...draw the bottom line of the brow to your desired shape. The powder base will give you more control of the pencil. You will notice that the pencil no longer goes on "Waxy".  Your brow will now have lasting power and won't easily smudge off.

Step Three:
Draw the top line of your brow and connect to two lines at the end.  The best way to get that SHARP edge and clean look is to repeatedly sharpen your pencil. I'm using the same pencil that I have used for years; Maybelline's Twin Eyebrow Pencil in Medium Brown. Remember, short, light strokes is the key. Pressing and dragging the pencil will give a very unnatural and hard look.

Step Four:
Fill in the space between the two lines.  Again, keep the point of your pencil SHARP!!! Use light, short and thin strokes.

Step Five:
Soften the starting point of your brow. No one's natural brown starts of with a harsh line. Using a spoolie or brow brush, gently brush the starting point of your brow.  Go in the direction that your hair grows. Use short, light strokes and be careful not to brush too far into the brow. Your goal is to create a natural fade/progression into your brow. At this point you can be done, voila! However, for an even sharper more defined look... proceed to step six

Step Six:
Add concealer to the bottom of your Brow. To do this I take a flat shadow brush and flatten it out between my thumb and index finger. I add NYX's HD Concealer in Tan to the back of my hand and add a LITTLE concealer to the tip of the brush. I place the concealer as close to the bottom line as I can. You need a STEADY hand for this step. Be sure to blend the concealer and smooth it over your brow bone.

Step Seven:
Highlight under your brow bone with the shadow of your choice.  Here I have chosen a matte nude/beige shadow. Now my eyebrow is Finally complete.  From this point out, I'll continue with eye shadow primer and the shadows to create my desired look.  

Here's what my face looked like when I was all said and done...
Full Face View

Another full face shot

I was so happy that I added lashes, they really complete the look!

Left Eye Close Up

Right Eye Close Up

Close Up on Both Eyes

One last full face shot

Well I hope that this helps you all out. There will be video soon, but as I said, I think that it is much easier for me to demonstrate and instruct while working on someone else.  So I will get that to you all in the coming weeks.  If you all have any questions, please some comments below, I'll be sure to get back to ya!!! Thanks for stopping by...

I'm Marshana Dahlia and I'm Ritchlie Beautiful


Thursday, January 3, 2013

The Accidental Smokey Eye

The Cut Crease

If you didn't know, I am LOVE with the look of a Cut Crease!!  To me this looks just screams definition and  style!!!  It's not an easy look if you don't have the "Eye" for it.  If you're not sure what a "Cut Crease" is, allow me to explain.  

A Cut Crease                                        

In the picture above you see the darker shadow is placed above my natural crease.  This gives the illusion of a larger eyelid, and gives me more room to play with eyeshadow.  Also, it allows me to wear a thicker eyeliner, which covers mot of my eyelid. Typically, I can't wear a eyeliner this thick without covering all of the shadow I applied.  In that case what is the point???  If you wear shadow, you want to be able to see it.  Hence the Cut Crease.

Now I'm no expert at the Cut Crease.  This is a new technique for me that I am perfecting on myself.  I can do this look on others with minimal effort, but on myself, it's a challenge.  Just take a look at a cut crease I created for my Cousin Chivonne recently.  

End of Day Closeup on Chivonne's Subtle Cut Crease

A couple weeks ago I had a very special fundraiser to attend.  So I attempted a Cut Crease. It did not come out as planned.  Looking my best was imperative...so I had to save the look.  I opted for filling everything in with a deep charcoal gray and sporting another fave look of mine, The Smokey Eye.  The look was a hit!!  Here are some pics of the final look and all the cool people I met that evening.

Businessman Kevin McGovern of The Water Initiative and I

Malaysia Pargo of Basketball Wives LA and I

The highlight of my night, meeting THE Deepak Chopra, Swoon!!!

Overall, both the Smokey Eye (Though not what I set out to do), and the night, were a success!!!!  I met great people, met new clients and had a fabulous time!!!! Tomorrow I'm back to NYC to work with some talented ladies I met this night. I'm excited and can't wait!!!

Be Blessed and Happy New Year!!

I'm Marshana Dahlia and I'm Ritchlie Beautiful


Tuesday, January 1, 2013

Happy New Year!!!

Woot Woot it's 2013!!!

Okay Okay, I know I know....I brought this blog back and then left you all hanging. Shame. On. Me. But hey, it's 2013 and it's time to start fresh!!!

                                                                  Happy New Year!!!

I've been up to a lot lately.  To quote one of my FAVE current Makeup Artists, "The Queen of Blending, Yes, I do Makeup, and no, it's not a hobby." Making beauty my business has not been pretty (Pun intended). I've been crunching numbers and crushing eyeliner!

                                A New Year's Kiss from Me, featuring M.A.C.'s RubyWoo!

I've been working on photo shoots, working with new clients and overall, having fun with makeup!

 My Cousin Chivonne posed for one of my photo shoots!  She's stunning and loves makeup about as much as I do!

So What's my New Year's Resolution, well, to keep you all happy. That means more updates, at least a few weekly, because I can't promise you daily.  And yes, video!!! I'm NOT the editing kind.  But I have to learn. I am sure you all do not want to sit and watch ALL THREE HOURS of my makeup application.

                                                                  The Eyes Have It!!!

                   Close-up, I didn't cover my three moles this time. I'm learning to embrace them.


So happy new year everyone!! Be happy, be blessed and be pretty!

I'm Marshana Dahlia and I'm Ritchlie Beautiful...